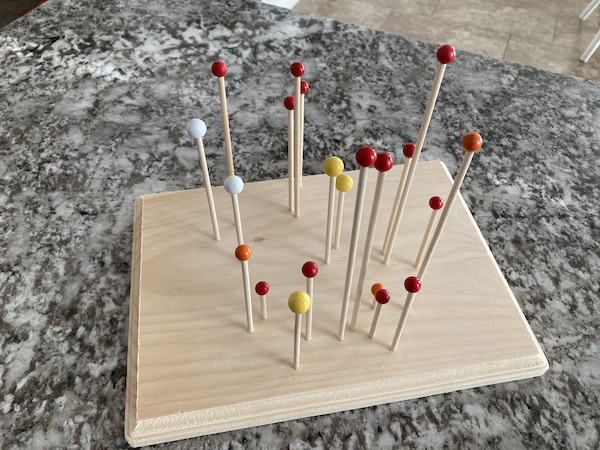
Make Your Own
Stellar Neighborhood Model
by Jamis Buck ([email protected])

Our stellar neighborhood is a charming bit of real-estate. Most of it is invisible to the naked eye—of the twenty-one stars within twelve light-years of Earth, thirteen of them are red dwarf stars that can't be seen without a high-powered telescope.
That's just not fair. So, to get better acquainted with our lesser known neighbors, I designed and built this wooden model of our stellar neighborhood. It makes a great conversation piece!
Want to build one of your own? I highly encourage it! Here's what you need to do.
Maps
Print these out and have them handy.
- Full-size map for laying out the model
- Legend map for identifying the stars
Note #1: the provided legend identifies the stars as being a "size" from 1 to 4. This is definitely not a standard stellar classification; I used this as a simplified way to represent the stars in the model, both by color and by relative size. Hard-core enthusiasts may prefer to look up the actual stellar classification for each star and choose a more nuanced way to represent their diversity.
Note #2: You'll notice a line on these maps pointing upward-ish from Sol; that's the direction toward the galactic center.
Note #3: It should be obvious, but I'll say it anyway: the sizes of the stars are not to scale. Only the distances and positions are to scale. If the stars themselves were to be represented to scale here, they would each be sub-microscopic.
Note #4: (a.k.a. "are we done with notes yet?") Some "stars" in this model are actually multi-star systems. Alpha Centauri, for instance, is actually three stars: Alpha and Beta Centauri, and a red dwarf that orbits them both called Proxima Centauri. Sirius, too, is a double star system. For simplicity, these have all been represented as a single star in the model.
Supplies
Your local hobby shop should carry most (if not all) of these items.
- One wooden board, at least 8"x8"x1"
- 1/8" wooden dowel rods (usually come in 12" lengths, sets of 10, you won't need all of them)
- Five 1/2" wooden balls
- Sixteen 1/4" wooden balls
- Four colors of paint (recommended: white, yellow, orange, and red)
- Wood glue
- Electric drill with 1/8" bit
- Pruning shears (or anything you can use to cut the dowels easily)
Instructions
- Use a copy of the large star map to mark the star positions on the board. (I laid the map on the board and pressed a Sharpie at each position, letting the marker bleed through the paper and onto the board)
- Use a 1/4" drill bit to drill a shallow hole (not more than 1/4" deep) at each position on the board.
- Working one hole at a time, place a dowel in the hole, measure it to about an inch in length, plus the length indicated by the smaller map, and cut it to size using the pruning shears. If necessary, use a small amount of wood glue to secure the rods in place. (The small map has the lengths for each rod. For example, Epsilon Eridani, #10, says "y=41mm". This means you'll cut the rod at about 1 inch + 41mm. Apologies for the mixed metrics!)
- Next, take two of the half-inch spheres and paint them white. These will represent the "size 4" stars, Sirius and Procyon.
- Then, take the remaining three half-inch spheres and paint them yellow. These will be the "size 3" stars (Sol, Alpha Centauri, and Tau Ceti).
- Take three of the quarter-inch spheres and paint them orange. These will be the "size 2" stars (Epsilon Eridani, 61 Cygni, and Epsilon Indi).
- Paint the remaining 13 quarter-inch spheres red. These will represent the "size 1" stars (the red dwarfs).
- Following the legend, glue the appropriate sized/colored sphere to each rod. For example, #14, 61 Cygni, says it is "size=2", so you'll glue an orange sphere there.
Good luck! If you build one, let me know how it goes; especially so if the instructions could have been more helpful.